
The landscape of Android customization is undergoing a significant architectural shift, moving away from traditional system-level modifications toward more integrated, kernel-based solutions. At the forefront of this evolution is ReSukiSu, a sophisticated root access management tool that represents the latest branch in a distinguished lineage of open-source development. As a direct fork of SukiSu Ultra—which itself emerged from the foundational KernelSU project—ReSukiSu offers a specialized approach to obtaining administrative privileges. By operating within the kernel space rather than the userspace, ReSukiSu provides users with a more discreet and powerful method of managing su permissions, enabling deep-level access to the /data and /system partitions, the installation of custom binaries, and the execution of advanced system modules.

Understanding the ReSukiSu Ecosystem
To appreciate the utility of ReSukiSu, one must understand its technical heritage. Kernel-based rooting differs fundamentally from legacy methods like Magisk. While Magisk "patches" the boot image to create a systemless environment, kernel-based solutions like ReSukiSu reside within the kernel itself. This allows the rooting mechanism to remain virtually invisible to many "root detection" protocols used by banking and high-security applications. ReSukiSu refines the SukiSu Ultra experience, offering a streamlined interface and improved compatibility for users seeking to push their hardware beyond factory limitations.

The transition to a kernel-based su manager is not merely a cosmetic change; it is a strategic move for power users who require granular control over hardware resources. With ReSukiSu, the ability to flash custom modules and modify protected partitions becomes more efficient, as the management app interacts directly with the kernel’s permission sets.
Pre-Requisites and Environmental Setup

Before embarking on the rooting process, a rigorous preparation of the digital environment is mandatory. Rooting is an invasive procedure that bypasses standard security protocols, and as such, requires a specific set of tools and configurations to ensure success and prevent device "bricking."
The first essential component is the Android SDK Platform Tools. This suite, provided directly by Google, contains the Android Debug Bridge (ADB) and Fastboot binaries. These are the primary communication channels between a desktop computer and the Android mobile interface. It is imperative to use the official binaries to ensure command compatibility and stability during the flashing process. Once downloaded, these tools should be extracted to an accessible directory on a PC.

The second phase of preparation involves configuring the device’s software environment. Users must navigate to the "About Phone" section in their system settings and interact with the "Build Number" field—tapping it seven times—to unlock the hidden Developer Options menu. Within this menu, two critical toggles must be activated: USB Debugging and OEM Unlocking. USB Debugging allows the PC to send complex commands to the device while it is in a functional state, while OEM Unlocking is the prerequisite for the most critical step: Unlocking the Bootloader.
The Bootloader: Breaking the Chain of Trust

Unlocking the bootloader is the definitive act of taking ownership of an Android device. By default, the bootloader is locked to ensure that only firmware signed by the manufacturer can be executed. Unlocking this gatekeeper allows for the execution of custom kernels and patched boot images. However, users must be aware that this process triggers a mandatory factory reset, erasing all internal storage, and typically voids the manufacturer’s warranty. Once the bootloader is unlocked, the device is ready to accept the ReSukiSu framework.
Methodology I: Rooting via Supported Custom Kernels

For users whose devices are supported by a custom kernel specifically designed for ReSukiSu, the path to root is relatively direct. This method is preferred for its stability, as the kernel is pre-configured to handle su requests.
The process begins with acquiring the ReSukiSu Manager app, which can be sourced via official GitHub Nightly builds or the project’s dedicated Telegram channel. Once the manager is installed, there are two primary avenues for deployment. The first involves utilizing a custom recovery environment, such as TWRP or OrangeFox. This is the most efficient route; the user simply boots into recovery and flashes the ReSukiSu-supported kernel zip file.

Alternatively, for those without a custom recovery, the ReSukiSu app itself can sometimes facilitate the kernel installation. However, this "Without Recovery" method is often more complex, requiring the user to manually locate a compatible kernel image—a task that can be difficult given the fragmented nature of Android hardware support.
Methodology II: The Patching Protocol for Standard Kernels

In scenarios where a pre-compiled, ReSukiSu-compatible kernel does not exist for a specific device, users must employ the patching method. This involves modifying the device’s existing boot files to integrate the ReSukiSu logic.
The complexity of this method depends on the version of Android the device originally shipped with. A significant architectural change occurred with the release of Android 13. Devices launched with Android 12 or older versions utilize a standard boot.img file for the kernel and ramdisk. Conversely, most devices launching with Android 13 or newer utilize a dedicated init_boot.img for the initial ramdisk, separating it from the generic kernel image. There are notable exceptions to this rule, such as the Poco F5 and Nothing Phone 2, which, despite launching with Android 13, still require the patching of the boot.img.

The execution of this method follows a precise sequence:
- Extraction: The user must obtain the stock firmware for their specific device model and region, extracting either the
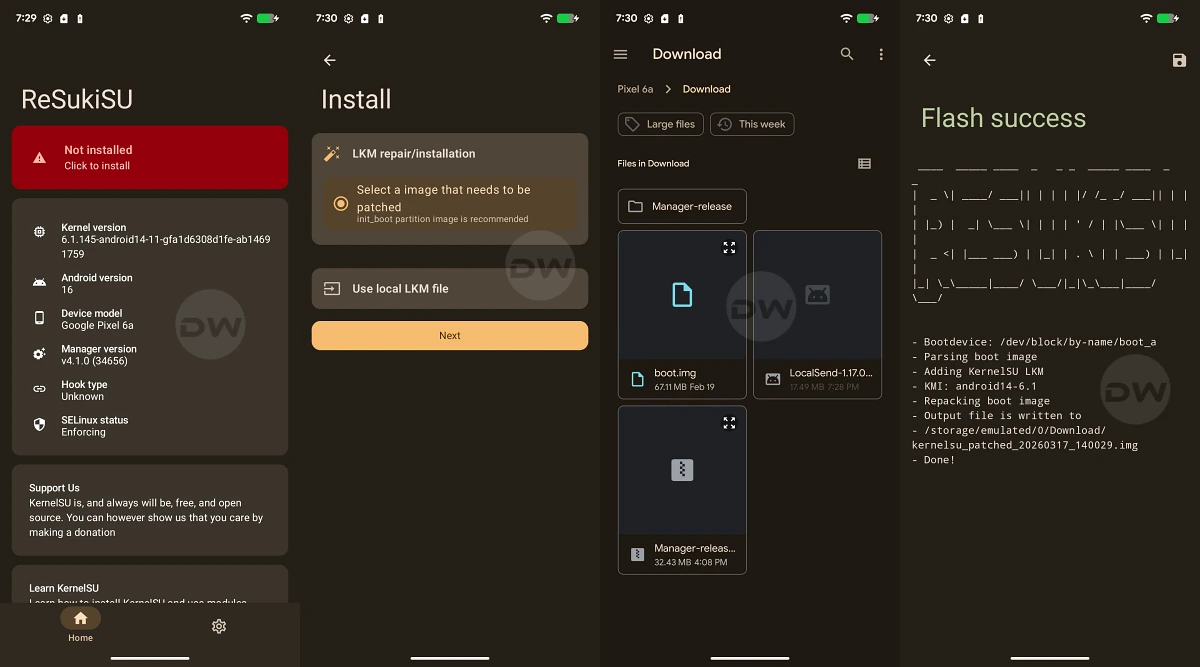
boot.imgorinit_boot.imgdepending on the version requirements. - Patching: The extracted image is transferred to the device’s internal storage. Using the ReSukiSu Manager app, the user selects the "Install" or "Patch" option and directs the app to the stock image. ReSukiSu then injects its su management code into the image, generating a new file, typically named
resukisu_patched.img. - Transfer: This patched file is moved back to the PC, specifically into the
platform-toolsfolder.
Deployment via Fastboot

With the patched image ready, the device must be placed into Fastboot Mode (also known as Bootloader Mode). This is achieved either via a hardware button combination or by executing the command adb reboot bootloader from the PC’s terminal.
For devices using the boot.img (Android 12 and older), the safest practice is to perform a "Live Boot" before a permanent flash. By executing fastboot boot resukisu_patched.img, the device will temporarily run the patched kernel. This allows the user to verify that the system boots correctly and that root access is functional within the ReSukiSu app. If the test is successful, the user can then finalize the root by using the "Direct Install" feature within the ReSukiSu app, which writes the patched logic to the device’s boot partition permanently.

For newer devices utilizing the init_boot.img, the procedure is more direct. The command fastboot flash init_boot resukisu_patched.img is used to write the modified ramdisk directly to the appropriate partition. Once the flash is complete, a simple fastboot reboot returns the user to the Android OS, now equipped with full administrative control.
Conclusion and Post-Rooting Considerations

Rooting via ReSukiSu represents a high-water mark in Android customization, offering a blend of stealth and power that legacy methods struggle to match. By operating at the kernel level, ReSukiSu allows users to bypass the limitations imposed by OEMs, enabling everything from advanced battery management and CPU overclocking to the removal of stubborn bloatware.
However, the power of administrative access comes with inherent risks. Modifying system partitions can interfere with Over-the-Air (OTA) updates, and the removal of certain security layers can make the device more vulnerable to malicious software if not managed carefully. Users are encouraged to maintain regular backups and stay informed through the ReSukiSu community to ensure their devices remain both powerful and secure. As the Android ecosystem continues to harden its security, tools like ReSukiSu remain vital for those who believe in the principle of true hardware ownership.
